Tài liệu Nghệ thuật xếp hình Nhật Bản:rabbit foelker trad 2 docx

Tài liệu Nghệ thuật xếp hình Nhật Bản:jack_in_a_box_2 ppt
... 12.
13.
14.
❴✎❵✦❬★❛✪❜✫❭✭❝✮❭✭❞✰❝✱❩✌❡
❢✵❣✛❤★❤◆✐
✂✁☎✄✝✆✟✞✡✠☛✁✌☞✎✍✑✏✓✒✕✔✗✖✙✘✛✚✢✜✙✣
1/3
7.
1/ 12
6.
1.
2.
1/ 121 / 12
8.
1−4
4.
3.
5.
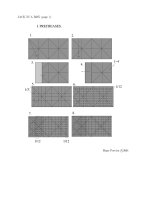
I. PRECREASES.
✤✎✥✦✘★✧✪✩✫✚✭✬✮✚✭✯✰✬✱✖✌✲
✳✵✴✛✶★✶
✜
✷✂✸☎✹✝✺✟✻✡✼☛✸✌✽✎✾✑✿✓❀✕❁✗❂✙❃✛❄❆❅❈❇
o
180
1/ 12
6. 7.
o
90
o
1.
90
o
90
o
90
o
2.
3.
5.4.
8. 9.
10.
II. ... ✿◆✻❖✽◗❘✷❚❙✌❅✲✺❋●✚❯✄✳✲●✭❅✡✯✲✱✴❙❲❱✩❇❚●❳■❋✳✲❂❲❍✌❊❋❅❆●✭❯✄✱
❨
❂✆❩✗❂✚❬❭✵✸✷❉❍❲✯✲✺❫❪❀✷❚❙✌❅✲✺✤❑
❴✭❵❜❛◗❝
✦✩❞
❝...


Tài liệu Nghệ thuật xếp hình Nhật Bản:triceratop pptx
... 29 .
The result. Repeat Steps 24 -28 on the right side.
30.
Pull the uppermost, double-thickness top layer to the
right to expose the hidden layer beneath. The paper
will not lie flat.
24 -28 ... small
preliminary base back down to the left.
20 .
Repeat Steps 13-19 in mirror image on the right side.
13-19 x1
21 .
Collapse the square at the top as a preliminary base.
22 .
Valley fold the...

Tài liệu Nghệ thuật xếp hình Nhật Bản: dahlia pptx
... Dahlia
Maarten van Gelder
1985 Nov
1 2
3 4
5 6AReverse fold in the center to
fold both ends up

Tài liệu Nghệ thuật xếp hình Nhật Bản:sphinx doc
... 180º
10
11
12
13
14
15
16
18
19
20
17
21
Esfinge
1
3
2
4
5 Desplegar hasta
el paso 2
6
7
8
9
J. Aníbal Voyer
53
54
55
56
57
58
59
60
61
34
35
36
37
38
39
40
41
43
44
42
22
23
24 Repetir del 15 al 25
a ... del 15 al 25
a la izquierda
25
26
27
28
29
30
31
32 Desplegar hasta
el paso 29
33
45
46
47
48 Al mismo tiempo que se
pliega esto hay que curvar
el modelo
49
50
51...

Tài liệu Nghệ thuật xếp hình Nhật Bản:arasaurolopus_baby docx
... 1
a
Bebé Parasaurolopus
Fernando Gilgado Gómez
8
9
7
6
5
4
3
2
14
12
15
13
11
10

Tài liệu Nghệ thuật xếp hình Nhật Bản: humming bird docx
... Hummingbird - Collin Weber Page 2 of 4
Hummingbird - Collin Weber Page 4 of 4
Hummingbird - Collin Weber Page 3 of 4

Tài liệu Nghệ thuật xếp hình Nhật Bản: totoro docx
... model and reform on
existing creases, bringing the
trapped paper to the front
Petal fold
2 3 4
5
6 7 8
9
11 12
10
Bring raw edges to the front
13
15 16
17 18 19
14
Designed and diagrammed by Robin
Tài liệu Nghệ thuật xếp hình Nhật Bản: arrow_2 ppt
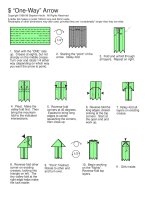
... “One-Way” Arrow (continued)
Copyright 1998-99 Stephen Hecht. All Rights Reserved
22 . Flip the tail assembly down.
23 . Pleat and tuck under diagonal edges.
Gently bend the model along the vertical ... facilitate the tuck. Then
flatten out to secure.
ONE
24 . Finished.
$ “One-Way” Arrow (continued)
Copyright 1998-99 Stephen Hecht. All Rights Reserved
12. Swing out the raw
edges from behin...
Từ khóa:
- nghệ thuật xếp hình nhật bản
- tài liệu nghệ thuật xếp giấy
- nghệ thuật xếp giấy nhật bản
- nghệ thuật xếp giấy nhật bản origami
- huong dan nghệ thuật xếp giấy nhật bản origami
- download nghệ thuật xếp giấy nhật bản origami
- học origami nghệ thuật xếp giấy nhật bản
- sách nghệ thuật xếp giấy nhật bản
- nghệ thuật xăm hình nhật bản
- nghệ thuật xếp giấy nhật bản dành cho người mới học
- tài liệu kỹ thuật soạn thảo văn bản
- tài liệu nghệ thuật thông tin
- nghệ thuật gói quà nhật bản
- tài liệu nghệ thuật sống
- nghệ thuật cơm hộp nhật bản
- Báo cáo thực tập tại nhà thuốc tại Thành phố Hồ Chí Minh năm 2018
- Nghiên cứu sự biến đổi một số cytokin ở bệnh nhân xơ cứng bì hệ thống
- Nghiên cứu tổ chức chạy tàu hàng cố định theo thời gian trên đường sắt việt nam
- Giáo án Sinh học 11 bài 13: Thực hành phát hiện diệp lục và carôtenôit
- Giáo án Sinh học 11 bài 13: Thực hành phát hiện diệp lục và carôtenôit
- Giáo án Sinh học 11 bài 13: Thực hành phát hiện diệp lục và carôtenôit
- Giáo án Sinh học 11 bài 13: Thực hành phát hiện diệp lục và carôtenôit
- ĐỒ ÁN NGHIÊN CỨU CÔNG NGHỆ KẾT NỐI VÔ TUYẾN CỰ LY XA, CÔNG SUẤT THẤP LPWAN
- NGHIÊN CỨU CÔNG NGHỆ KẾT NỐI VÔ TUYẾN CỰ LY XA, CÔNG SUẤT THẤP LPWAN SLIDE
- Phát triển du lịch bền vững trên cơ sở bảo vệ môi trường tự nhiên vịnh hạ long
- Phát hiện xâm nhập dựa trên thuật toán k means
- Nghiên cứu tổng hợp các oxit hỗn hợp kích thƣớc nanomet ce 0 75 zr0 25o2 , ce 0 5 zr0 5o2 và khảo sát hoạt tính quang xúc tác của chúng
- Thơ nôm tứ tuyệt trào phúng hồ xuân hương
- Sở hữu ruộng đất và kinh tế nông nghiệp châu ôn (lạng sơn) nửa đầu thế kỷ XIX
- Quản lý nợ xấu tại Agribank chi nhánh huyện Phù Yên, tỉnh Sơn La (Luận văn thạc sĩ)
- Tăng trưởng tín dụng hộ sản xuất nông nghiệp tại Ngân hàng Nông nghiệp và Phát triển nông thôn Việt Nam chi nhánh tỉnh Bắc Giang (Luận văn thạc sĩ)
- Tranh tụng tại phiên tòa hình sự sơ thẩm theo pháp luật tố tụng hình sự Việt Nam từ thực tiễn xét xử của các Tòa án quân sự Quân khu (Luận văn thạc sĩ)
- Giáo án Sinh học 11 bài 15: Tiêu hóa ở động vật
- chuong 1 tong quan quan tri rui ro
- Giáo án Sinh học 11 bài 14: Thực hành phát hiện hô hấp ở thực vật